
Clients need a salon website to find directions, compare prices and make an appointment. It doesn’t have to be complex, but it will need to run smoothly, and do a fantastic job of representing your brand.
That’s what motivated us to create Fit Web Topics: Salon Edition. It is the most cost effective approach to make a modern salon website that’s simple, fast and contains all the features customers like to use. As a WordPress theme, our template is easily customized with your own branding. It just requires a couple of clicks–no programming required.
This guide will explain how to create a set up a WordPress salon site in only half an hour. If you have any questions along the way, you can submit a query in our consumer forum.
Fit Online Themes: Salon Edition
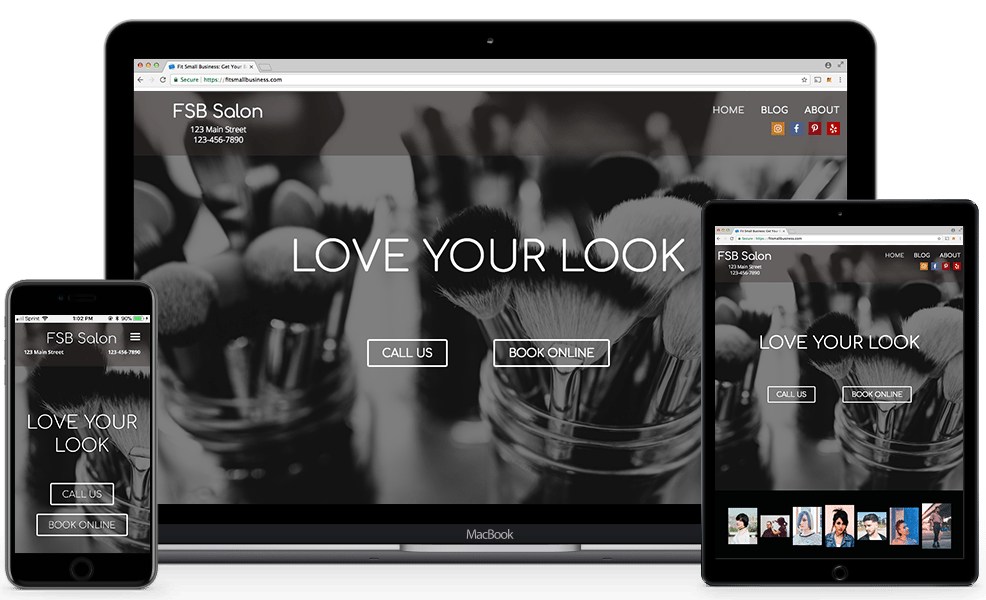
Our website template includes all the must-have salon website features, including photo galleries, booking buttons, and cellular functionality. At precisely the exact same time, you’re going to get full control over the format and style of your website. You can adjust colors, fonts, and add/remove sections from a simple menu. There’s no programming needed.
To utilize Fit Web Topics: Salon Edition You Will Need a WordPress account. In case you’ve got one already, you can skip to installation instructions below. Otherwise, we will demonstrate how you can establish a WordPress account next. Using Bluehost, you receive a WordPress site, custom domain (www.YourSite.com) and company email, all starting at just $2.95/month.
Step 1: Get Your Domain Name & Hosting
To create a company WordPress website, you first need a hosting strategy. We advocate Bluehost since they combine all into one package (site, domain AND professional email accounts) beginning at just $2.95/month.
To get started, just follow the link and then click on”Get Started Now.” The first step is to choose your hosting package. Their basic plan is only $2.95/month if you sign up for 36 months. It needs to be sufficient for many single-location salons. The”plus” strategy is really only necessary if you have to create more than one website, or plan on using more than 5 business email accounts.
The next step is to choose your website domainname — e.g. www.YourSalon.com. While Bluehost allows you to choose between different extensions, for example .net or even .biz, most salons elect for a. Com name, since its the most popular and well known. If your top choice is taken, think about adding an additional word, such as your town name, or have a look at our high 25 domain name ideas for further tips. You can also enter ideas below to see what’s available:
Last, you will enter your payment information and finalize your order. Keep in mind, in order to receive the very best pricing, you need to pay for 3 years upfront. But, you might also cancel within 30 days for a complete refund.
Step 2: Set Up WordPress
Once you’re signed up for Bluehost, you will be prompted to specify a password and then confirm your email address. Next, you’re going to be sent to the Bluehost welcome page. There is 3 quick settings to change here:

- Click”My Websites” on the left panel, then”Manage Site.”
- Locate the”Settings” panel. In the box which says”Site URL,” alter the temporary URL to the one that you just bought. This ensures your new domain is linked with your new site.
- Click the”Security” tab. From the box that says”Free SSL Certificate” click enable. This will definitely change your website to an”https,” which is better for search engine rankings.
When you’re finished, click”Log in to WordPress” and we will begin designing your site.
Step 3: Install & Customize Fit Web Themes
Clicking”Log in to WordPress” will direct you to the WordPress dashboard. This is where you are going to design your website pages, make edits, add site articles, etc.. Before getting started, however, you need to get Fit Internet Themes: Salon Edition installed on your website. To do this, hover over”Appearance” on the menu and click on”Themes.”

Click”Upload” from the top-right corner:

Now click on the button”Upload Theme” at the top of the display. This should open a prompt to upload a document. Download Fit Web Topics: Salon Edition here, then upload this entire .ZIP file onto WordPress. Once loaded, click”Install Now.”
Once finished, click”activate.” You’ll now have our theme installed on your site. The next step is to begin designing!
Customization Menu
Designing your website is as easy as adding your small business info and uploading your own photos (or using our supplied rights-free pictures ). If you like, it is also possible to make easy adjustments to the colour scheme and format of the site.
Fit Web Themes: Salon Edition was designed to be as user-friendly as you can. Yet, it’s also highly customizable: You’ve got full control over colors, fonts, and page formatting, all managed from the easy-to-use customization menu.
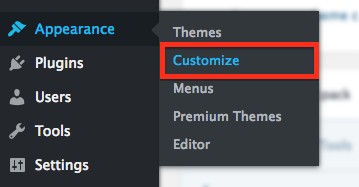
To begin, hover over”Appearances” on the left-hand toolbar, then click”Customize.”
The customization menu has been split into subsections, like Header and Social Links. Click on the buttons below for instructions on each segment — and remember, you can even ask a question in our user forum.
Click Box For Instructions
Header
Layout the header panel to your website. Now you have the choice of uploading a symbol for your own salon, or simply entering your business name as text (you will be able to adjust the font later.) Under that, enter your street address and contact number. If you still need a logo, check out designers on Fiverr. It’s possible to hire a designer to get as little as $5.
By default, the header colour is transparent black. This permits you to easily read the white text, while still making your background picture visible behind it. If you want to change the header or text colour, simply click the box and use the sliders to adjust it.
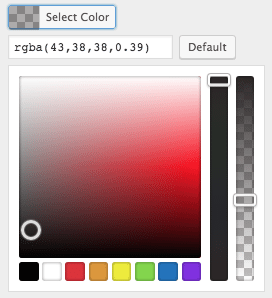
Adjust colors easily with the color selector (centre ) and transparency slider (far right).
Social Links
Add social media icons into the top-right corner of your site. Just paste your webpage link under the appropriate area and the icon will automatically appear. There’s also an choice to add an email address using a email icon.If you haven’t created social media accounts yet, learn about the advantages of Facebook, Yelp, and Instagram for company. This is particularly important to get a salon or spa company, where visual material can make or break your business.
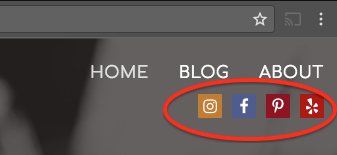
Social icons show up on the ideal side of the header.
Design
Select your website’s font and color themes. By default, the site uses Comfortaa for headers, and Open Sans font to the body. However, it is possible to choose different fonts and preview them instantly to the right.
Body font is used in paragraph sections like”About” or”Hours.” Your headings font looks in section names, and sub-headings can be used for buttons, and your primary navigation menu.
| Body Fonts | Header Fonts |
|---|---|
| Open Sans Montserrat Lora Playfair Screen Comfortaa Raleway Arimo |
Anton Roboto Slab Fjalla One Francois One Vidaloka Shrikhand Volkhov Satisfy Dancing Script |
Default Background Color will adjust the background color for certain sections and pages on your site. The reason it does not change the background colour everywhere is since some sections (such as Location and Gallery) possess their own color controllers.
If you would like to use the same background color across your entire site, simply select your color, then locate the 6-digit HEX color code. Write down this, or copy it to your clipboard, then use it everywhere else you need to use this color.
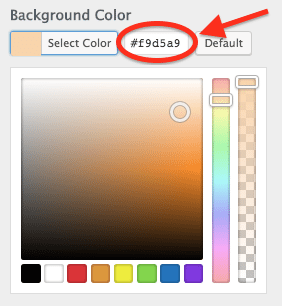
Copy/paste this code to re-use colors.
Section Order
Choose which sections that you want to appear in your homepage, and in the sequence. Simply click and drag a segment to re-arrange. Or, click on the eyeball icon to remove a section from your website.
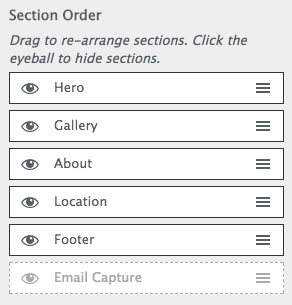
Click on the eyeball to conceal a segment, or drag to rearrange.
Here’s a rundown of those 6 homepage segments available for this subject:
- Hero. Features a title, background photo and 2 (optional) buttons. This should always appear at the top of your site.
- Gallery. Adds a simple picture gallery to your homepage.
- About. A place to bring a brief bio, list of services or cost sheet to your salon.
- Location. Shows your speech, hours, and contact information, plus an embedded Google Map.
- Footer. Add textlinks, or images to the bottom of your site.
- Email Grab. An optional mailing list signup form powered by Mailchimp.
Section: Hero
The hero section features a massive banner picture with bold, capitalized text, and two (optional) buttons underneath. Think of this as the primary”headline” of your website. It ought to capture your customers’ attention, supply a very simple summary of your business, and give people a effortless way to proceed via the 2 buttons.To add a picture, you can pick one of the three default pictures we’ve supplied (brushes, and haircut, or towels), or even upload your own. If you do not have a top quality image of your company just yet, you may find more royalty-free photos on Pixabay, Unsplash, or Pexels.
Once a photo is uploaded, pay careful attention to your color scheme. If your photo is dark, ensure that your text brightly colored– or if your photo is rather bright, use dark colored text instead. The”Background Color” enables you to further lighten or darken your image by adding a transparent layer over the picture.
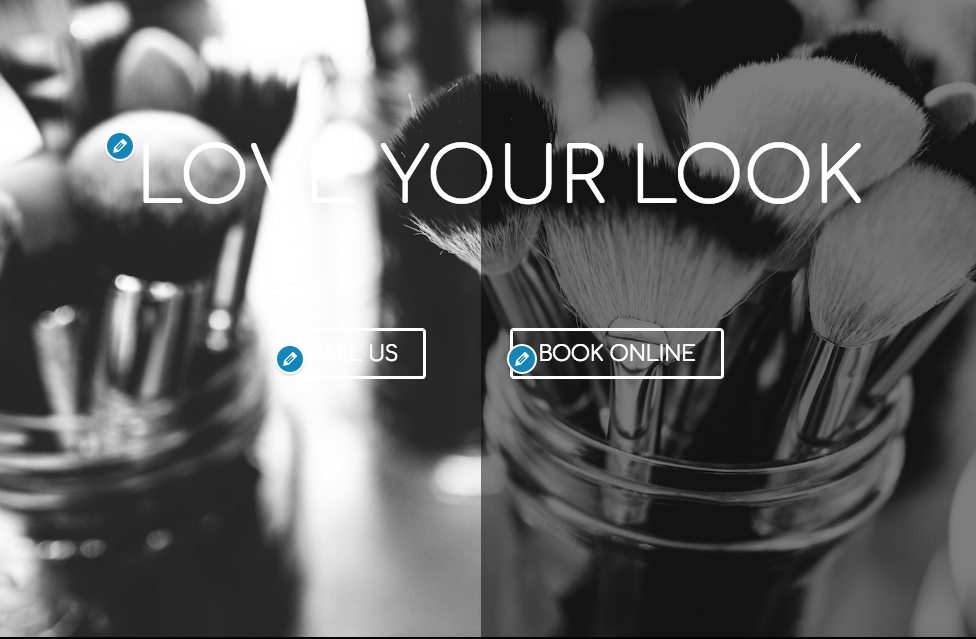
Comparison: The left side is a raw image. The right side includes a 50% transparent black coating.
For instance, above I added a transparent black layer over my picture (right side). Notice how much easier it would be to read the text and button compared to the first image (left side).
Adding Buttons
To add buttons, simply enter button , and a URL where the button must lead. Also select a color and button style that matches your website theme.
To change the button , return to the Layout menu on the previous page. Change the”subheadings font” to adjust the button text font.
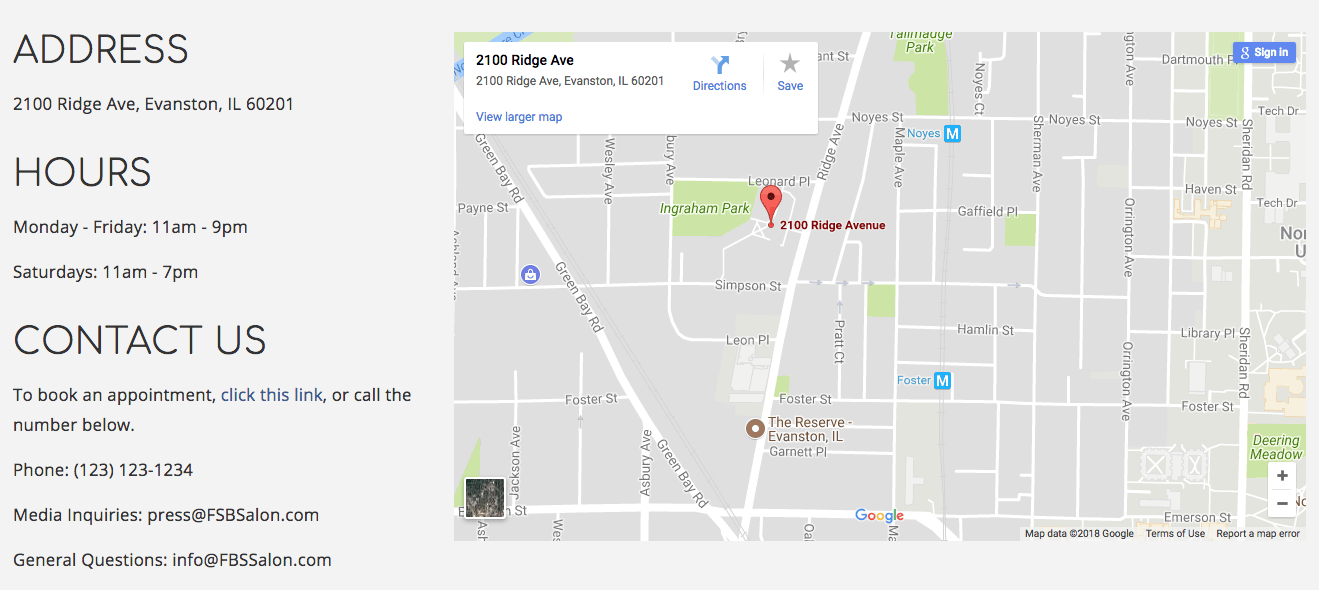
Section: Location
A simple menu to include essential business information, such as your address, hours of operation, and contact information.This section also features an embedded Google Maps widget which shows your address for a pin on the map. To put this up, you’ll need a Google or Gmail account (which you can create for free), then follow these directions from Google to find an API key.
Section: Gallery
A simple gallery to display photos of your very best work, or shots from your salon/spa interior. You may upload as many photos as you’d like. The photographs will appear as thumbnails, and people can click to zoom-in. By default, your own photo gallery appears just under the hero because this is a choice spot to display what your business offers. If you wish to move or eliminate the gallery, then you can do by going back, then clicking Section Purchase .
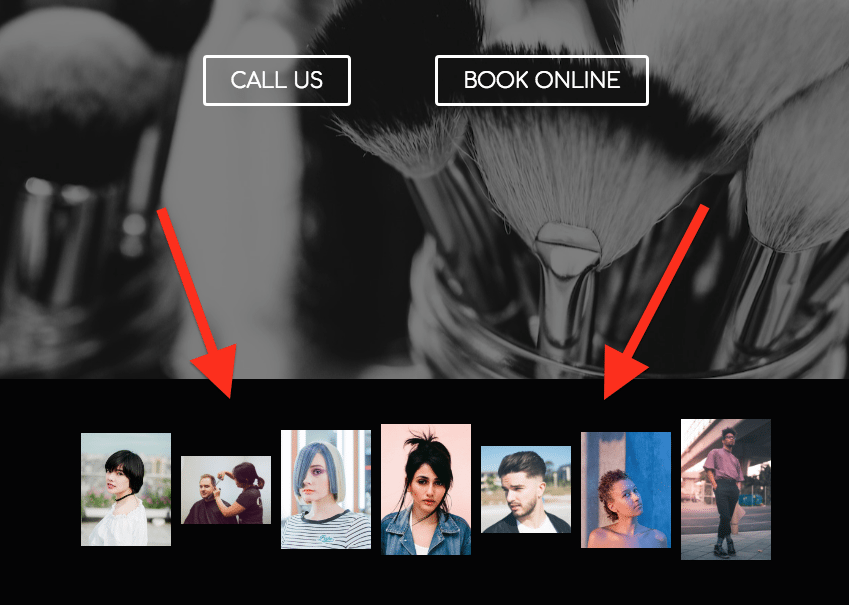
A picture gallery with 1 row, 7 columns without a title.
Layout Columns changes the amount of columns on your picture gallery. You can use it to increase or decrease image dimensions. As an example, changing it to 3 will feature larger rows of 3 images each.
Section: Around
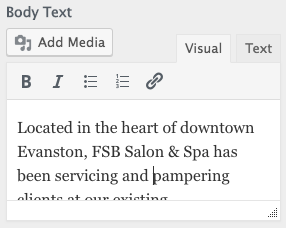
Insert a paragraph description of your salon/spa. You might even use this section to record your services or prices. We’ve supplied a rich text editor so that you can add links, photos, or modify the type of your font.
By default, the roughly section has a black background with white text to coincide with the gallery directly above it. If you would like to alter this, simply click the Background Color and Text Shade boxes.
Section: Mail Grab
This is an optional section for Mailchimp users who wish to bring an email newsletter signup form on their site. Simply write a header and subheader, then add your Mailchimp API Key and Listing ID. This will make an email signup area seem below.As along with all the sections, you can proceed email capture to wherever it fits best on your website. If email marketing is a significant priority for your salon, consider moving it just below your hero to maximize signups. Only head to Department Purchase and drag email capture above the other segments.
If have not begun email marketing yet but are interested in trying it out, Mailchimp has a free variant for small companies. Click here to sign up, or find out more about what they provide in our email advertising software buyer’s guide.
Section: Footer
Like the header, your footer appears on each page of your site. It’s typically used to post website credits, photo credits, and copyright information. It is also possible to add up to 6 accolades, which are small icons which represent awards, accomplishments, or media links for your industry.

Accolades can consist of salon awards, certificates, press links, social networking links and much more.
Simply click”Insert new Accolade,” and upload a picture. Ideally this should be a transparent PNG, so it doesn’t clash with the background colour of your site. You also have the option to link a URL, e.g. the article that mentions your enterprise.
To find these logos, simply use Google Images. Set the colour to”transparent” on the top menu bar.
Navigation Menus
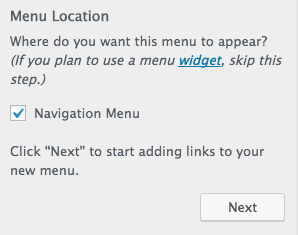
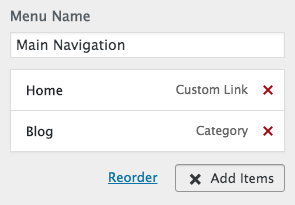
Create your primary navigation menu, which will show up on the web site header.Click”Create new Menu” and name it”Main Navigation” or something comparable. Check the box which says”Navigation Menu” and click Next.
Click”Add Items” This opens a menu where you can decide which links to add to your navigation bar. As you have only created 1 webpage up to now (Home) there will not be too many choices. Click”Home” for today — you can add more later.
Once you’ve completed making edits to the customization menu, then click the gear icon up top and choose”Save Draft.” Click the X to head back to the main dashboard. You can return into the customization menu in any time to keep workingout.
Step 4: Add More Pages To Your Site
While not always necessary, most salons like to add extra pages to their website, such as About, Services, or Our Story. It provides you the chance to add extra info without creating your homepage overly crowded. If you’ve got a very long menu of products or services for sale, this is especially excellent way to display your costs.
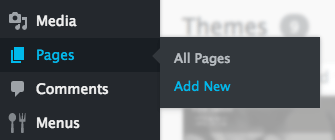
To create a page, return to your dashboard and click on”Pages” on the left toolbar. Click”Add New.”
For every page you create, there are 3 Important elements to finish:
- Page Title. Insert at the very top.
- Page Slug. The URL of the page you are creating; insert just below the title.
- Page Contents. Add in the huge box below. To include a photograph, click”Add Media.”
Once finished, you can preview your page, save it as a draft, or simply click”Publish” to go live. You can always make edits afterwards, even after it is published.
Do not include extra pages for the navigation menu, so they’ll be connected on top of your website!
Create a Website For The Salon Website
If you would like to produce a website to post news updates, share fashion tips, promote special events, etc.,. WordPress is a great platform for it.
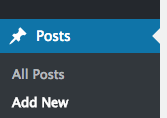
Simply head to”Articles” on the right left menu bar, and click”Add New.” The same as creating a new page, you’ll add a name, write text and add images/media content.
I suggest saving each blog posts under the exact same category name, such as”Blog” or”Updates.” This way, adding your blog into your main navigation bar is easy. Click”Add Items” >”Groups” >”Blog”
If you wished to create 2 different sites (e.g. one for style tips, another for information and updates), then only use 2 distinct categories. Then you can link to them separately on your navigation bar.
Step 5: Publish Your Website
When you’re ready to go live, click the Bluehost button on the left menu:

Now locate the box which says”Launch Your Site” and click”Launch”

This is going to make your site go live. You should now be able to type your URL and get your site. If you are getting an error, head back to Step 2 and verify that you entered the ideal URL under the”settings” panel.
The Most Important Thing
Besides your website and domain name, Bluehost also provides 5 professional email accounts that use your domain ([email protected]). To set this up, check out our guide on creating a business email accounts.
As a brand new website owner, you’ll also need to learn how to rank high on Google searches. Be sure to also check our marketing department for even more hints in tips on enhancing traffic and getting more clients through the door.
If you are still having difficulty setting up your site, or have any remaining questions about the best way to utilize Bluehost or WordPress, then you can even drop us a line on the forum.